Automate a sequence of projects
While Lokad does its best to perform operations as fast as possible, many operations take several minutes or even more to complete. Therefore, in order to avoid keeping you waiting while the results are being computed, Lokad provides scheduling capabilities to auto-trigger processes on a scheduled basis. In addition, the process sometimes requires a whole sequence of operations to be performed in the correct order. As a result, Lokad also offers orchestration capacities to define a sequence of operations to be executed.
Table of contents
Project sequences
With a Lokad account, multiple types of projects can be created. In particular, it is possible to create a project sequence by selecting:
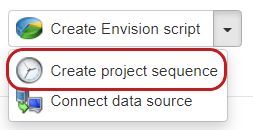
This type of project can be configured for both scheduling and orchestration purposes. Once the new project is created, click Edit to start modifying your project.

Configuring an automated run
The sequence project can be executed either manually - by clicking Run like any other project - or automatically through its own execution schedule. By default, when a sequence project is created, the scheduled execution is disabled. In order to enable the scheduled execution, two options are available: you can check the Scheduled or the On file changes box and then click Save.
Setting a schedule
When using a time schedule, it is possible to choose between two types of frequencies (either daily or weekly) and to define the time and the applicable time zone. The time should be entered as a 24h entry (aka 13:00 is 1PM).
We typically suggest to have a master sequence that is executed every night (after midnight in the dominant time zone business-wise). This sequence starts with refreshing the data - assuming that Lokad has a data connector - and ends with the various reports. This pattern ensures that you get “fresh” Lokad numbers every morning.

Setting a trigger based on file changes
Alternatively, a file upload can be used to trigger the sequence run. File paths must begin with / and the file name can contain one * wildcard. Subfolders of the specified path are not taken into account.
This sequence scheduling can support several trigger patterns, meaning that the sequence will run each time a file corresponding to one of them is uploaded or updated. If a sequence is intended to run every day at the end of an FTP transfer of a series of files, we suggest to use the last file of the FTP list (possibly a dummy file) as trigger path.

Configuring the orchestration
Once the new project sequence has been created, it is possible to define the actual sequence of projects to be executed. First, you need to select the project to be part of the sequence. This can be achieved by clicking the button Add projects. The sequence mode of execution can be set to Sequence or Parallel.
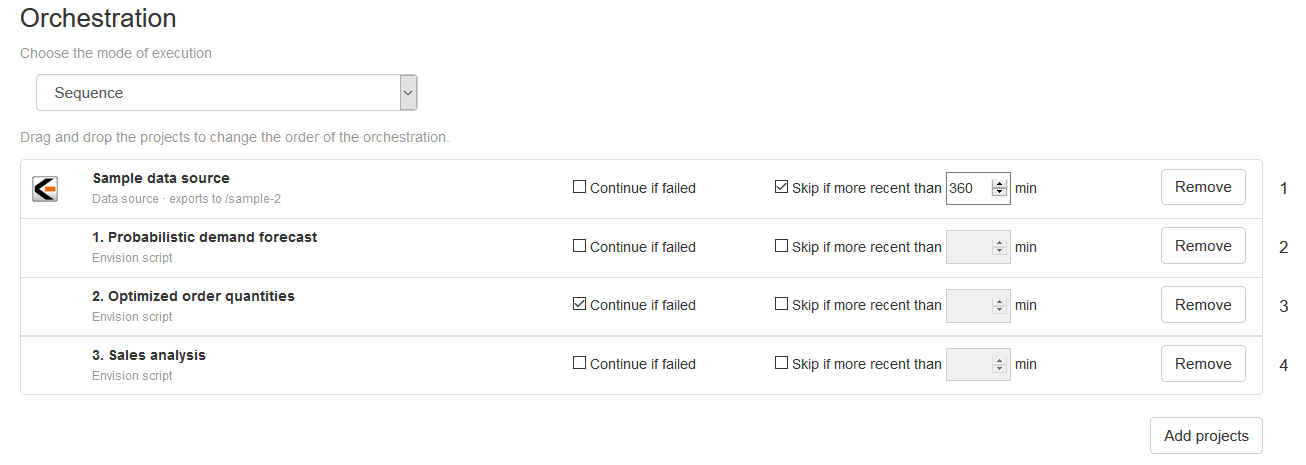
Each project comes with a few settings:
Continue if failedindicates whether the sequence should proceed with the next project in the list if the previous project has failed to complete successfully. This setting can typically be checked if the rest of the sequence has no strict dependency on the failing project.Skip if more recent than N minutesis used to speed up the execution of long sequences. For example, refreshing a data source can take up to several hours, but if the data source has already been refreshed in the last 12 hours, there is no need to refresh it again.
File action (move, copy, delete)
On top of defining the actual sequence of projects to be executed, you can create the whole workflow of file actions that will be performed by your runflow. Numerous types of file actions can be executed, i.e., a sequence can move, copy, and delete files and entire folders that match a selected pattern. To perform a file action, you need to access your sequence and click on the Edit button:

Then click on Add file action which is located at the bottom of your runflow:

Once a file action is initiated, you are able to move, copy, and delete files and folders. Just select and apply the actions of your interest:

Here we present an example of deleting all the files from the path /clean/OptimizationPO/*:
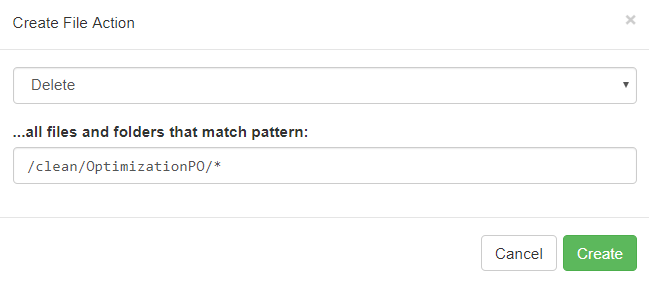
Confirm your action by clicking on the Create button. Now, decide when the action should be executed, e.g., before all other scripts of Orchestration are run. Remember to save your edited runflow. Use file actions mindfully, especially when deleting the entire folders. Enjoy the sequence executing the projects and file actions for you.
Email notifications via Zapier
You can receive now real-time updates on your Runflow projects pushed from Lokad via a Zapier App. Zapier allows an automatic e-mail or SMS text generation and will send you alerts, e.g., each time a project sequence of your interest successfully completes. This will allow you or your team to start using the refreshed dashbords and the latest results as soon as they are available.
In this sub-section we describe the necessary steps you need to take to let Zapier automate your workflows and send you automatically-generated emails with notifications. All you need to do is to create a custom webhook URL and attach an existing Runflow project to a Zapier REST Hook. To do so, access a Zapier App website, sign up to Zapier and click on “Make a Zap!”. Next, choose one of the Trigger built-in apps, namely “Webhooks”, tick “Catch Hook” and click on “Save + Continue”. These steps will allow you to generate and copy a webhook URL. Just remember to click on the grey “Copy” button displayed below:
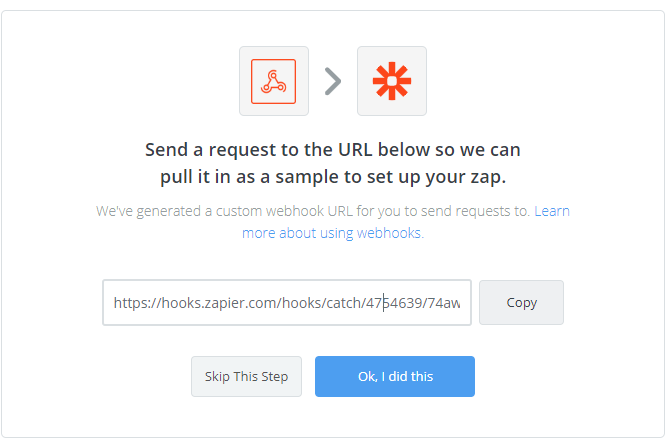
Next, leave the Zapier App website open and go to your Lokad account. Select a Runflow of your interest and click on the “Edit” sequance button. Select, e.g., that you wish to be notified when a seqence successfully completes. In that case, tick “Completed successfully”. You need to attach a Zapier REST Hook to an existing Runflow project as follows:
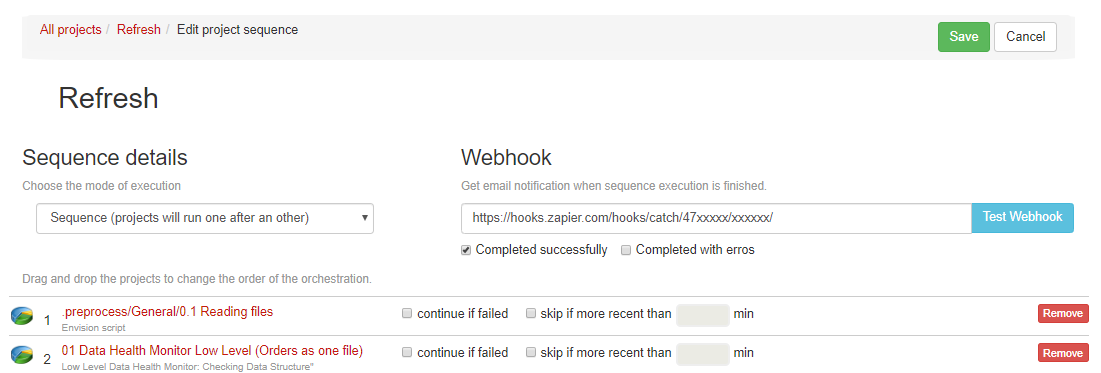
Still being logged-in to your Lokad account, you should double-check the Webhook. Just test it to make sure that you correctly completed all the steps so far. Again, remember to save the edited Runflow project. Click on the “Save” button. Now, go back to the Zapier App website and click on “Ok, I did this”.
The only step left to set up your Zapier is to provide an email address towards which you wish to send the notifications. This time, choose the second Trigger App, “Email by Zapier” and fill the requested fields. We present an example below:
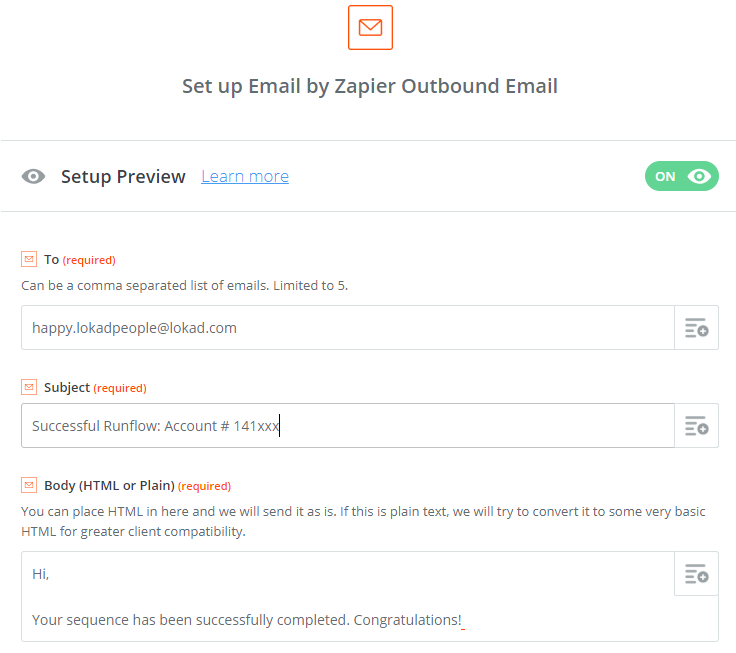
Do not forget to click on the “Finish” button once you complete all the steps. Congratulations! The Runflow project will notify Zapier on every termination of your sequence.