SSO (single sign-on) with SAML
Lokad supports identity and access management systems (IAM) through SAML. This feature lets users safely use their usual company accesses to log into our system without actually disclosing any credentials to Lokad. Also, the feature removes the need for yet another password when using Lokad’s app. From an IT administration perspective, this features provides a centralized way of controlling employee IT accesses, including access to Lokad.
Table of contents
Understanding the SSO workflow
Your Lokad account will be linked to a domain name of your choice, typically the domain name used for the email addresses of your employees.
The login process is as follows:
- Go to https://hub.lokad.com (like a normal Lokad login)
- Enter your company email address
- Lokad recognizes that the domain has been configured for SSO
- Lokad redirects you to the identity provider associated with the domain
- Confirm access while being redirected to the identity provider of your company
- Upon successful authentication, you will be redirected to Lokad
- Enjoy your access to Lokad
Depending on the authentication policies of your company, you may or may not have to re-enter your company credentials. Typically, most policies require the credentials to be re-entered once in a while. These policies are not under the control of Lokad as they are being delegated to your company’s IT system when SSO is used.
Setting up SAML
This section is intended for the IT department. SAML is a mechanism to achieve SSO (single sign-on). The SAML setup requires administrative privileges within the identify provider used by the company.
We recommend setting up SAML early. Lokad does not charge anything for this feature. We propose two distinct procedures for the setup. Both procedures require an intervention of the Lokad support staff.
- Direct-to-production: SAML is configured in the Lokad production environment. This may cause users to be unable to log in - for a few hours - while tests are underway. It should only be used if such a downtime is acceptable.
- Testing-then-production: SAML is configured and tested alongside the production environment, so that users are not prevented from logging in. However, this procedure takes a bit longer, and involves more steps for the IT department.
Both procedures involve scheduling a test with the Lokad support staff. The purpose of the test is to validate that the new authentication mechanism is working and thus to avoid an accidental long downtime where all users would lose their access to Lokad. This test can be coordinated through email exchanges, but a call with the Lokad support staff can be scheduled on simple request.
If the test fails, then the Lokad support staff reverts the account to its pre-SAML configuration, and will propose a new test at a later date.
In order to activate SAML, you first need to decide which internet domain name will be associated with your Lokad account. As Lokad identifies users by their email address, it is usually the domain name used for the company email address that should be used.
Second, you need to identify the user who will be performing the authentication test. This user username@example.com needs to be registered in the Lokad account - otherwise the test will fail. If your Identity Provider requires users to be explicitly allowed to connect to applications using SAML, please ensure that username@example.com has been granted this permission.
Then, you need to send an email message to contact@lokad.com with:
- SAML activation for example.com in the title of the message
- A message that clarifies if you wish to proceed with Direct-to-production or Testing-then-production.
- the SAML IdP Metadata file, as a file attachment. This file, typically named
metadata.xml, can be obtained from your IAM system.
Upon reception of your SAML activation request, Lokad’s support staff validates that all the users of your Lokad account have an email address that matches the specified domain name. Otherwise, these users would lose their access to Lokad after the SAML activation.
Direct-to-production Procedure
Configure SAML on your end with these settings:
- Entity Id:
https://hub.lokad.com - Reply URL (or ACS URL):
https://hub.lokad.com/saml - Logount URL: none
Once the Lokad staff has received the SAML IdP Metadata file (see above), the Lokad staff will propose to schedule a test with a user.
During the time frame scheduled for testing SAML, the user username@example.com should to visit https://hub.lokad.com, and enter their e-mail address as their login, then click the “Sign in” button to initiate the SSO via SAML. If successful, the user is redirected to https://go.lokad.com as an authenticated user.
Please send an email message to contact@lokad.com with:
- The time when the test was performed
- A screenshot of the resulting page.
The two most frequent errors at this stage are:
username@example.comis not invited to Lokad - hence SAML succeeds, but there is no corresponding user on the Lokad side.username@example.comhas not been allowed to use SAML to connect to the Lokad third-party application.
Upon reception of the successful test, the Lokad staff locks in the new SAML configuration.
Testing-then-production Procedure
This procedure operates into two stages, first over a testing environment, second over the production environment (as above).
Beware: if the Replay URL (or ACS ULR) cannot be changed without regenerating a new SAML IdP Metadata file (this happens with some Identity Providers), then only the Direct-to-production procedure can be used.
Configure SAML on your end with these settings:
- Entity Id:
https://hub.lokad.com - Reply URL (or ACS URL):
https://hub.lokad.com/testsaml - Logount URL: none
During the time frame scheduled for testing SAML, the user username@example.com should to visit https://hub.lokad.com/testsamlsmart?login=username@example.com, and enter their e-mail address as their login, then click the “Sign in” button to initiate the SSO via SAML. If successful, the user is redirected to https://go.lokad.com as an authenticated user.
Please send an email message to contact@lokad.com to indicate that the test has been successful.
Update the SAML on your end with the setting:
- Reply URL (or ACS URL):
https://hub.lokad.com/saml
The rest of the procedure is identical to the Direct-to-production Procedure detailed above.
The most frequent error at this stage is the accidental regeneration a new SAML IdP Metadata file while changing the Reply URL.
FTP and FTPS accesses
Both FTP and FTPS rely on a login/password authentication scheme. As a rule of thumb, when introducing SSO, we believe that it is best to get rid of Lokad-specific passwords altogether instead of maintaining some of the logins/passwords just for the sake of transferring files to Lokad. We recommend upgrading towards SFTP using public keys for authentication. The public key authentication is not impacted by the SAML activation. In case SFTP is not an option for your company, feel free to notify Lokad’s support team about this and we will provide you with an alternative solution.
Annex: Azure Active Directory and Microsoft Office 365
The SAML-based SSO is implemented by the Azure Active Directory that is included in most Office 365 plans. The general process on the Azure side is:
- Add a new application (link)
- Assign users to the application, so that they are allowed to use it (link)
- Enable and configure SAML-based SSO (link)
- EntityId:
https://hub.lokad.com - Reply URL:
https://hub.lokad.com/samlorhttps://hub.lokad.com/testsaml(see above) - Sign On URL:
https://hub.lokad.com - User Attributes and Claims: we only need
emailaddress
- EntityId:
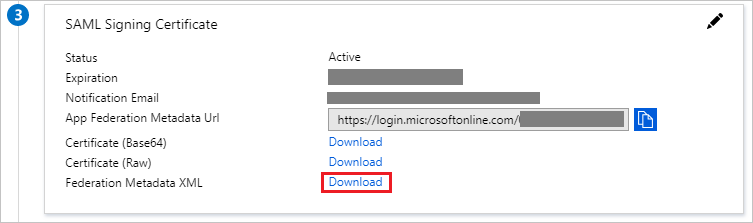
The last page includes a link to download the metadata file:
Annex: Google Workspace (formerly Google Apps)
Google Workspace can be used as a SAML identity provider. See this SAML tutorial for more information.